Robot Manager Dashboard

Robot manager english version

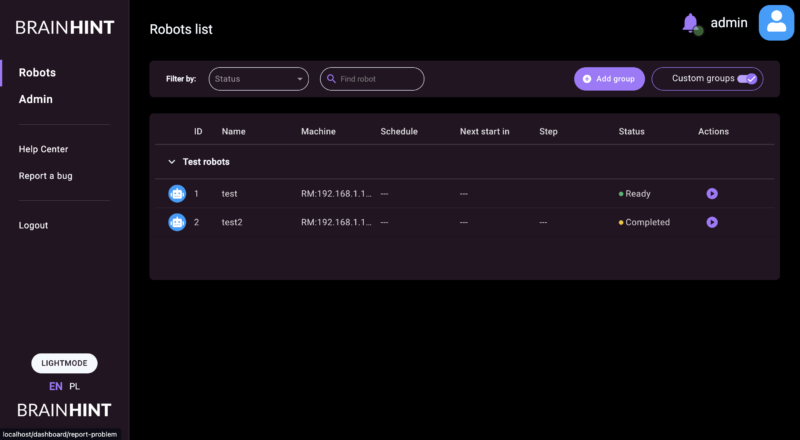
The user panel comes in both dark (default) and light versions. The ability to switch between color versions is available by pressing the “LIGHTMODE” / “DARKMODE” button located in the lower left corner of the page.

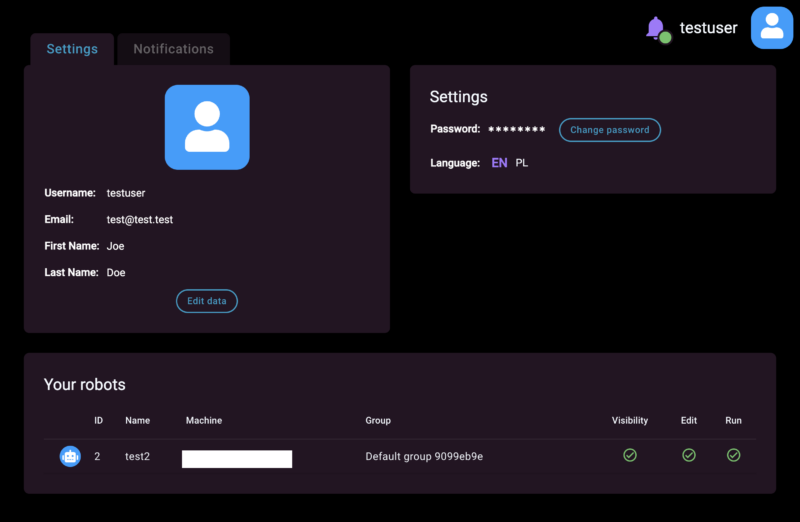
The user panel comes in two language versions (Polish and English). It is possible to change the language smoothly by pressing the appropriate button (PL/EN) located below the color version change button.

User Interface

Robot Manager user interface consists of:

Robot List


robot list desc

The Robot’s List includes: 

  • Robot icon 
  • Name of the robot. 
  • The name of the machine on which the robot is located. 
  • The name of the schedule by which the robot is run.  
  • Information about when the next robot launch will take place. 
  • Robot’s status. 
  • Buttons to manually start/stop the robot.  

Startup is possible by selecting the button or by setting a schedule, in which case the robot will start automatically. 

Robots are grouped according to the user’s own settings or according to the Machine on which they are located. Grouping can be changed by pressing the button next to custom groups“.

Robot Details

robot details

Robot management panel allows to view basic information about the robot, i.e. its description, the name of the machine it is installed on, the date of its next startup or the permissions of the currently logged-in user. The User also gets a real-time view of the current stage of the robot’s work, thanks to the progress panel on the right side, which updates as the robot runs.

At the bottom of the robot’s management panel, there are also tabs for schedules, logs, documentation, configuration and history of robot runs, the operation of which is described in detail below. 

Robot Schedules

robot schedule


Managing robot startup using a schedule is implemented by selecting the “Schedule” option.  Robot can run according to many different schedules. New schedule can be added by pressing the “+ Add Schedule” button. You can also delete and edit existing schedules, thanks to the buttons under the “Operations” heading.

To determine how often the robot should run, select the appropriate time units in each of the available categories (minutes, hours, days of the month, months, days of the week). For example, according to the Schedule shown in the image above, the robot will start every day, every minute. You can limit the frequency of the robot’s startup by changing specific time parameters.

Robot Logs

The appearance of the logs may vary from robot to robot. Using the top panel, it is possible to filter robot’s logs based on date, type or keywords. It is also possible to download the logs from the preview panel, thanks to the “Download” button at the bottom of the page.

robot logs

Robot Configuration

On the page for managing robots, it is possible to make changes to their configuration. The “Configuration” tab is used for this. After selecting it, a configuration form will appear to us, allowing us to edit specific settings of the robot (for example, the email address to which emails are to be sent). After making changes to the form, press the “Save changes” button. 

robot configuration

The form automatically checks the basic correctness of the data entered. For example, the correctness of the form of e-mail addresses, and if there is an error, additional information will appear on the screen, and saving changes will not be possible.

Robot Documentation

robot documentation

Documentation (describing, among other things, the robot’s actions and configuration) can be previewed by selecting the “Documentation” tab.  The robot’s documentation is uploaded by BRAINHINT when adding a new robot to Robot Manager, but can also be changed by administrators in the admin panel from the robot’s settings, e.g. when updating the documentation.

After clicking on the Previewbutton, a panel will open up for us to read documents in both txt and pdf formats and download documentation with the Downloadbutton at the bottom of the page.

Robot History

robot history

History is a list of notifications for a given user about a given robot. It can be displayed by pressing the “History” tab. These notifications can be about the robot starting or stopping, as well as changes in the configuration, schedules and permissions of a given user, as well as about the occurrence of an operating error.

User Profile

user profile

When you click on the username or the icon located in the upper right of the user interface, you will be taken to the User Profile.

From this page it is possible to edit user data, including username, email, first name, last name, password, profile icon, preferred language. Here the user can also view all assigned robots and permissions against them; the groups they belong to and their own notification preferences, along with the ability to edit them.

Help Center

robot help center

Here you will find Robot Manager’s business documentation (the document below), Robot Manager’s user manual, scheduling instructions and a Frequently Asked Questions (FAQ)section, which contains minor instructions and explanations.  


robot help center instructions

Administrators have access to the Support Center resources from the Admin Panel, allowing them to decide which resources will be displayed to users or edit answers to questions, as well as add their own new instructions or questions. 

Reporting an error

Getting to the error reporting form is possible by pressing the Report a Bugtab located in the left menu of the site. This link is located below the Help Center. 

Report a bug section

The bug report form makes it possible to report a bug concerning both a single robot and the entire Robot Manager. After completing the subject of the report, the degree of urgency and a description of the problem, an email with the report will be sent to those responsible for Robot Manager on the BRAINHINT side, as well as to all Robot Manager administrators on the client side.